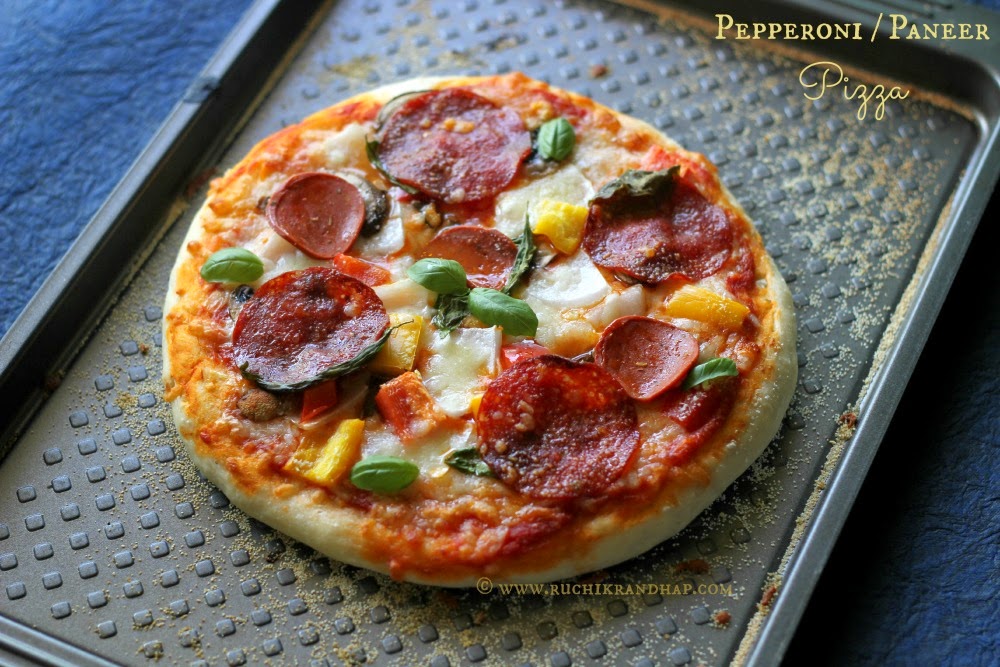
↑
  • Skip to primary navigation
  • Skip to main content
  • Skip to primary sidebar
  • Home
  • About
  • Recipes
  • Recipes A-Z
  • Travel
  • Copyright
  • Media
  • Privacy Policy
  • Shop
  • Contact Me
  • Somethin’ Fishy

Ruchik Randhap

Food & Memories of Mangalore

You are here: Home / All Posts / Pepperoni Pizza – Basic Recipe

November 10, 2014

Pepperoni Pizza – Basic Recipe

12
SHARES
TwitterFacebook12PinterestPocketTelegramWhatsAppYummly
Pin
My achievements in the baking field are driven by two things – my passion to bake and the undying support and encouragement from the husband. If my cakes have progressed from burnt rocks to deliciously moist edible goodies then I have him to thank as he has survived them all without discouraging me or asking me to give up and spare the ingredients that I have wasted over the years. My cakes are well received at home, no matter what recipe I decide to try and no matter what the outcome. If it wasn’t for him I don’t think I would have enjoyed baking so much – so thank you Roshan!
However, on the flipside the same man who loves my cakes and appreciates them also pesters me to try breads – something I was simply not interested in baking. My logic was that I couldn’t wait all those hours taken by the dough to prove and who had the energy to knead the dough I said. If bread was available in the store it was more than enough for me and I never felt the need to create it from scratch at home. But then the whole logic of buying a big oven when we moved to Dubai was this – that I could make different kinds of breads and bake multiple ones in one go. Alas! That point is shoved into my face time and again so like the numerous other things that I have been coaxed into trying (like blogging for example) he convinced me that I should give pizzas a try.

Pin
Reluctantly I agreed. I said I would only knead the dough and give it to him, the rest was his job. Somehow I never left the kitchen after kneading the dough, I drifted into the whole pizza making process and it was so enjoyable. Together we created our first pizza and it was so much fun!! We realised that we are great at creating breads, together. Over jokes and some hi fives at achieving simple milestones we carried on with the flattening of the base and chopping of the ingredients and making the topping and finally popped the pizza into the oven.
The nervous dad paced in the kitchen waiting for his baby to pop out, literally 🙂 I was watching the pizza throughout the first 5 minutes and I must tell you that it was wonderful watching the dough rise. It was simply magical and although I have baked some unsuccessful loves of bread over the years nothing matched up to this.
Pin
Even if I sound like a stuck tape I must tell you that when the pizza arrived from the oven it was glorious and tasted so so wonderful and fresh and wholesome! Unlike the commercially available ones we knew exactly how we had made it and what ingredients went into it. It was quality and freshness guaranteed. This was not junk food at all, it was a wholesome meal (yes, yes, I know that plain flour is not the best, but wait until I get my hands on a recipe that calls for wholemeal flour)
Pin
The four little pizzas we made had different sauces and different toppings – we are yet to experiment and note down the ingredients. Our little fellow was overjoyed when he got back home from school that day. He had homemade, fresh, hand tossed (errr, okay! hand flattened!) pizza made from scratch!
This is just the beginning for us and we hope to delight you with many more delicious pizza recipes in the months to come. I hope you will give this a try soon and entertain your guests during the upcoming festive month. It’s a perfect savoury meal option for Christmas you know! A little prior preparation and you are ready to handle a big crowd with elan! Enjoy!
Pin
And hey, here’s a small announcement, ZipList will no longer be supporting the recipe box and shopping list platform. Effective December 10th, ZipList will discontinue ZipList mobile app, the ZipList.com website, and the ZipList White Label recipe box and shopping list services. If you have been using the RecipeBox feature on my blog to save your recipes via ZipList you will no longer be able to save them but ZipList is making it possible for you to make a smooth transition and store all the erstwhile saved recipes. Please read more here

Pepperoni Pizza

For the dough/base/crust:

  • 3 cups all purpose flour (maida)
  • 1 cup lukewarm water
  • 1 packet active dried yeast (I used the 11gm instant dried yeast)
  • 1 teaspoon salt
  • 1 teaspoon honey
  • 1 tablespoon olive oil + extra to grease the bowl

For the topping:

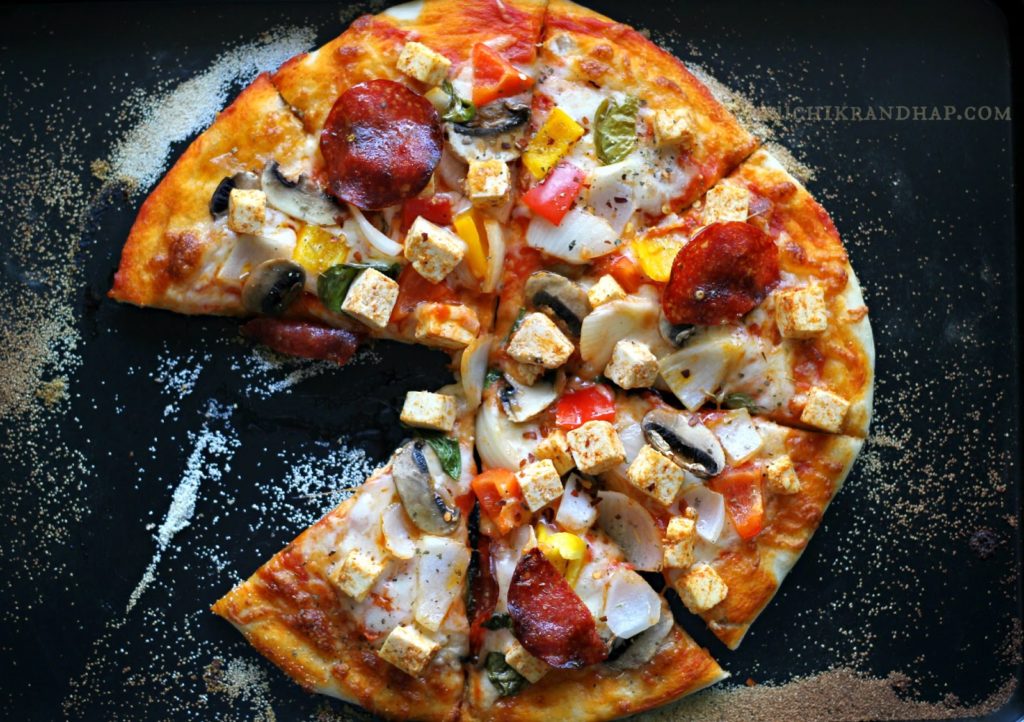
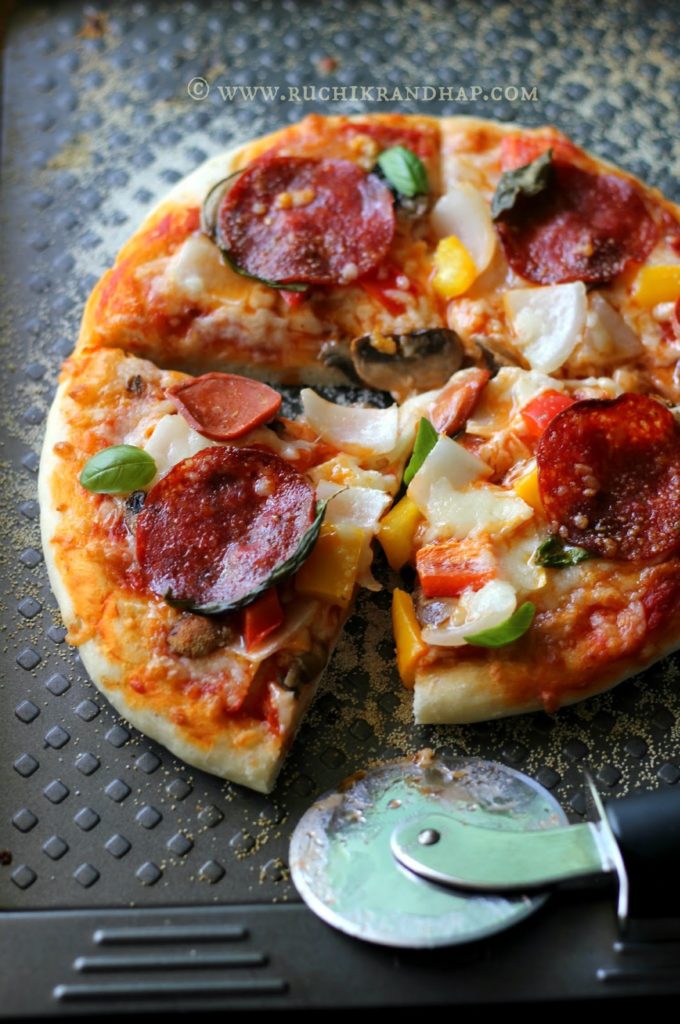
  • 1 cup marina (pizza/pasta) sauce – we used store bought sauce
  • 150 grams sliced pepperoni
  • 1 cup cubed paneer (cottage cheese) (optional) * see note#2
  • 1/2 large white onion cut into large cubes
  • 5-6 button mushrooms cleaned and sliced
  • 1/2 red bell pepper cut into chunks
  • 1/2 yellow bell pepper cut into chunks
  • 1/4 cup basil leaves
  • parmesan cheese (as required)
  • cheddar cheese (as required)
  • mozzarella cheese (as required)
Other things required:
  • 1-2 large baking sheets/trays
  • 2-3 tablespoons cornmeal or fine polenta or fine semolina (rava)

Method:
Make the pizza base:
1. In a mixing bowl add the yeast, honey and 1/4 cup of the lukewarm water. Stir to dissolve and allow the mixture to froth, about 10 minutes. If the mixture has not frothed and doubled in size, discard it and repeat the procedure with good quality/new pack of yeast
2. Once the yeast has frothed add the salt, olive oil, remaining warm water and 1 cup of flour and stir to mix.
3. Reserve about 1/4 cup of flour and add the rest little by little (totally you need to use up 2-3/4th cups of flour – the reserved flour is to dust the board on which you will knead the dough).
4. Dust a clean working surface/kneading board with the reserved flour and transfer the dough from the bowl onto it. Using the heel of your palm knead until you get a smooth pliable dough without any cracks on the surface.
5. Oil a bowl generously with olive oil and place the dough into it – roll it all around so it is coated with the oil. Cover the bowl with a clean, damp tea towel and keep the bowl undisturbed for 30-40 minutes in a warm corner of your kitchen to double.
6. When the dough has doubled remove it from the bowl and gently deflate it using the tips of your fingers (poke it) and cut the dough into 4 parts using a sharp knife (see note#1)
7. Take one part of the dough and shape it into a ball by gently stretching the dough from all sides and tucking the ends beneath the ball (as if you are covering the ball with a cloth and tucking the ends under it) do this 6-7 times gently, so that the surface of the ball doesn’t develop any holes.
8. Place the dough balls on a baking sheet and cover again with the damp cloth and let them double in size, for about 20 mins.
9. When the dough balls have doubled, remove one part out and place it onto a lightly floured kneading board and stretch and flatten it using your hands and shape into a rustic pizza, try to keep the edges slightly thicker than the center.
10. Gently transfer the pizza base onto a baking sheet/tray dusted with cornmeal/polenta/semolina

Make the toppings:
1. Leaving about 2-3 cms from the edges apply the pasta/pizza sauce evenly over the base.
2. Decorate the rest of the base with the other toppings – mushrooms, paneer, red and yellow bell pepper cubes, onion cubes, cheddar and parmesan cheese.
3. Top with grated mozzarella and basil leaves

Bake the pizza:
1. Preheat the oven to 230 degrees C for about 15 mins.
2. Place the tray with the pizza on it onto the lowest rack of your oven and bake for 4-5 minutes. Then reduce the heat to 200 degrees C and transfer the tray to the middle rack and continue to bake
for another 5 minutes or till the base looks golden and the cheese has melted in.
3. Remove the pizza and use a pizza cutter to divide it equally. Serve hot!

Notes:
1. If you wish to make 4 small personal pizzas, about 6 inch diameter in size, then cut it into 4 parts otherwise just cut into 2 parts so that you get two pizzas of roughly 8-9″ diameter.
2. If you are using paneer instead of pepperoni you need to marinate lightly in the spice of your choice. We marinated the paneer lightly with red chilli powder, amchur (dry mango) powder, kasuri methi, salt – you can use tandoori masala or tikka masala too.

Recipe source: www.foodwishes.com

12
SHARES
TwitterFacebook12PinterestPocketTelegramWhatsAppYummly

Filed Under: All Posts, Bakes, Breads Tagged With: Homemade Pizza, Paneer, Pepperoni, Pizza

Reader Interactions

Leave a Reply Cancel reply

Your email address will not be published. Required fields are marked *

Recipe Rating


This site uses Akismet to reduce spam. Learn how your comment data is processed.

Comments

  1. Aruna singit says

    January 6, 2016 at 5:10 am

    If we don't have an oven then how to bake the pizza base can you suggest me please?

    Reply
  2. Shireen says

    January 23, 2016 at 9:21 am

    @ Aruna: You can bake the pizza base if you have a microwave with convection too. Alternatively you can bake the base on a regular tawa on a very very slow gas. Make sure that the tawa is greased with oil and dusted with rawa and then cover the pizza base with a large bowl or vessel so that the heat is sealed inside. I hope this works for you!

    Reply

Primary Sidebar

Looking for Something?

Stay Connected

I am Shireen Sequeira a Mangalorean living in Dubai. I love trying out new recipes and giving them a twist of my own. However, I do try my best to preserve the authenticity of traditional Mangalorean recipes. Know More...

Trending This Week

  • Butter Cake | How To Make Soft & Moist Butter Cake
  • Traditional Irish Christmas Cake
  • Gule Sukhe (Black Eyed Peas Sukka)
  • How To Cook Brown Basmati Rice
  • Special Surmai (Kingfish) Curry (With Or Without Coconut)
  • Lepo Losun Miri (Sole/Tongue Fish in a Spicy Garlic & Pepper Curry)
  • Moong & Karela Curry (Sprouted Mung Bean & Bitter Gourd Curry)

Subscribe To Receive Recipes Directly In Your Mailbox!

Categories

  • Airfryer Recipes
  • All Posts
    • Recipe Compilations
  • Baby & Toddler
  • Bakes
    • Breads
    • Cakes, Cupcakes & Brownies
    • Cookies, Tarts & Bars
    • Healthy Bakes
    • Pies & Puffs
  • Basic Recipes
  • Beverages
  • Breakfast
  • Chicken
    • Indo Chinese
  • Chutneys Dips & Sauces
  • Coconut Milk Based Recipes
  • Eggs
  • Festive Cooking
    • Christmas
    • Monthi Feast
  • Global Cuisine and Fusion Food
  • Home Remedies
  • Mangalorean Recipes
  • Meal Ideas
  • Mince
  • Mutton Beef and Pork
  • Poli & Seasonal Specialities
  • Preserves
    • Pickles & Jams
    • Spice Blends & Curry Pastes
  • Pressure Cooker Recipes
  • Recipes With Video
  • Restaurant Reviews
  • Rice, Pasta and One Pot Meals
  • Seafood
    • Fish
  • Soups & Salads
  • Starters, Snacks & Savouries
    • Appetizers & Starters
    • Snacks & Savouries
  • Sweets & Desserts
    • Indian Sweets
    • Western Desserts
  • Thanksgiving Recipes
  • The Boshi Series
  • Travel
  • Uncategorized
  • Vegetarian
    • Curries, Dals and Sambhars
    • Paneer
    • Sides
    • Vegan
  • When The Hubby Cooks!

Copyright © 2022 · Ruchik Randhap by Shireen Sequeira · Hosted & Managed by Host My Blog