
Folks! I can’t stop raving about this recipe! I am so over the moon today as I type this post. After several failed attempts (and I mean way too many attempts!) I managed to create the perfect pao. Pao is also spelt as Pav and is synonymous with the famous pav-bhaji, a quintessential Mumbai style street food that has been a pocket-friendly meal for thousands of people on a shoestring budget and over the years has found its way into fine dining restaurants too.
Making my own pao at home was not going to be that simple or easy I thought. You see, I had given up even before I started. Creating mounds of fresh, spongy bread from a blob of dough took a lot of hard work I thought. Well, the secret lies in the recipe, no? And of course the technique of doing the right thing. On my initial few attempts at baking pao at home I didn’t quite use the technique properly. Either I didn’t knead the dough properly, or I didn’t shape it properly so I ended up with hard lumps which could be termed as ‘pao ke naam pe dhabba’ (in a very Hindi TV serial way of speaking) or simply put, an apology of a pao. I will admit that making 24 paos will take some patience and time but only if you are obsessed about neatness and perfection like I am. I like to weigh each dough ball and ensure that they are all of equal weight. Shaping them then becomes a delight and not to mention, a pleasing sight when baked.


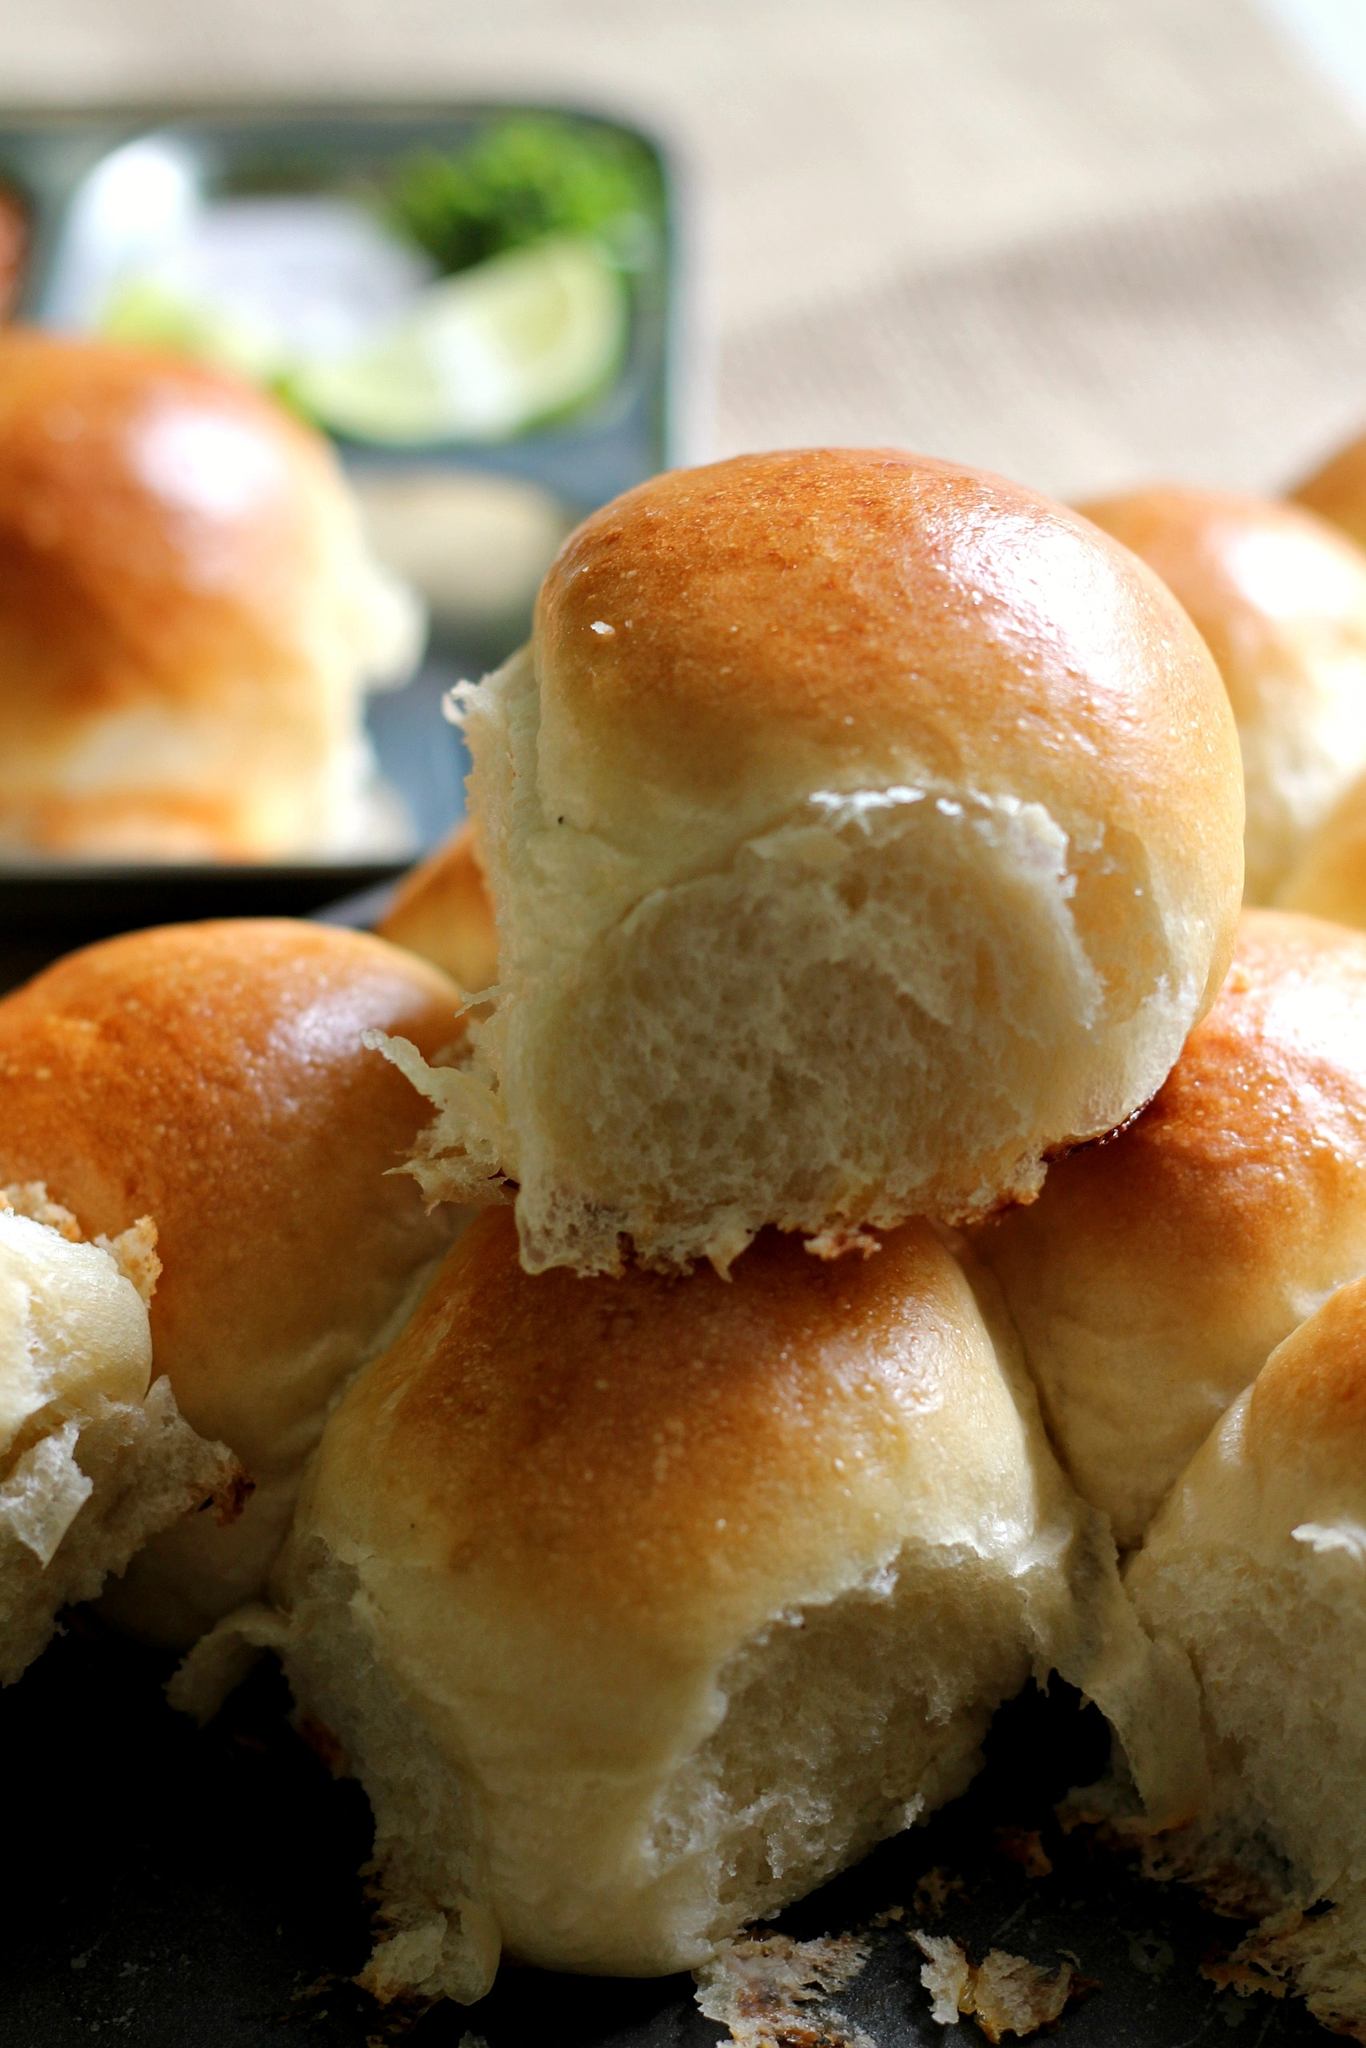
My joy knew no bounds when the pao appeared out of the oven. They looked like a honeycomb – beautifully golden and symmetric in some strange sort of way. I couldn’t stop taking pictures and I was amazed that despite the very dull and cloudy weather outside last week I got some beautiful shots. The only thing I missed to do was take a shot of the bread when torn open. Maybe I’ll do that when I take pictures of the ‘Keema Pao’, another recipe that I tried that day which is simply mouthwatering to say the least.

I adapted this recipe from the blog Dustie’s Foodie Adventures where David shares some delectable recipes for Goan food! (Thanks a million David!). Do note that his pao recipe calls for whole wheat flour (not your usual chapati flour though) and I used all purpose flour (maida) and hence it required some tweaking to make the dough pliable and smooth. Next time I plan to try out the whole wheat version. Will share my experience soon! For now, if you have been hesitant about making your own pao at home, look no further. Try this recipe and let me know how they turned out!

Pao (Pav) ~ Dinner Rolls
Ingredients
- 6 cups (720 grams) all-purpose flour (maida)
- 2 tablespoons instant yeast
- 3 tablespoons sugar
- 2 teaspoons salt
- 1/3 cup olive oil or any odourless vegetable oil
- 2 cups lukewarm water * see notes
For the egg wash
- 1 egg lightly beaten
- 1 tablespoon water
To brush on top of the paos
- 2 tablespoons milk or unsalted butter at room temperature
Instructions
- First, we will activate the yeast. In a large mixing bowl place the yeast, 1/2 cup of flour (60grams) and 1 cup of the lukewarm water and mix together. Cover and keep in a warm place for about 10-12 minutes or until the mixture turns frothy and doubles up. This is to test your yeast. If the yeast does not froth up it is probably old (expired or nearing expiry). Discard the mixture and start again with a new package. If the yeast has nicely frothed up you are good to go.
- To the yeast mixture add 4 cups (480 grams) flour, sugar, salt & olive oil and the remaining water (**see notes first) and mix everything together. You will get a dough that is very sticky. Tip the dough on a clean working surface dusted with a little flour. Add the extra 1-1/2 cups (180 gms) of flour in parts and knead until you get a soft and pliable dough. You may need to knead it for a good 10-12 minutes to achieve a soft dough that is not sticky but one that will leave a light dent if you poke it and spring back up slowly.
- Grease a bowl with some oil and transfer the ball of dough into it. Flip it around till it is well coated with the oil. Cover the bowl with cling wrap and keep in a warm place in your kitchen for about 1-1/2 to 2 hours or until the dough has doubled in volume.
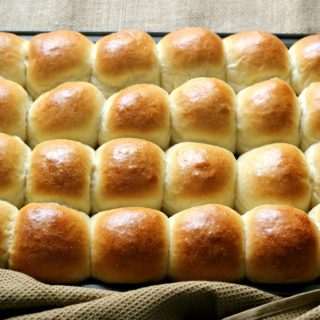
- Once the dough has doubled, gently punch it down to deflate. Then using a kitchen scale weigh the dough. You should get approximately 1200 grams of dough which you will then divide into 24 equal parts of 50grams each. This is for the sake of precision in the shape and size of each pav. Alternatively, you can simply pat out the deflated dough into a rectangle and then roll into a log and cut it into 24 equal portions. But remember, uniformity is a beauty.
- Grease and/or line a 38x26 cm tray (14x10 inches) with butter. You can dust the tray with some flour for easy removal.
- Roll each portion into a ball. You can cup the dough ball between both your palms and stretch the dough using the sides of your thumbs and tuck the excess dough underneath. Gently roll between your palms to form a smooth, crack-free surface. Place these dough balls on the buttered tray, about 1/2" apart. Cover with cling wrap or a clean, damp kitchen towel and keep in a warm place for about 30-40 minutes or until doubled.
- When you are ready to bake, preheat the oven to 200 degrees C. While the oven is preheating, gently brush the tops of the dough balls with the egg wash (or milk if you are not using egg). Take care not to press the brush too hard or you will deflate the pav. Pop the tray into the oven and bake for 10 minutes. Then drop the temperature to 180 degrees C and bake for another 8-10 minutes or until the surface looks golden.
- Remove the tray and quickly brush the pav with some milk or butter. Transfer the tray to a wire cooling rack and let the pao cool for 10-15 minutes. Do not rush to pull them apart when still hot as the steam needs to leave the centre of each pav naturally. Cutting hot bread can make them soggy on the inside.
- Serve with tea or coffee or as an accompaniment to Mumbai style vegetable & potato mash (pav-baaji) or with minced meat (keema pav) or any side dish of your choice. Paos keep well for upto 2 days at room temperature if you live in cooler temperatures or have central AC
Notes
Disclaimer
The nutritional values are only indicative.
Thanks Shireen for this lovely bread recipe… Would like to know what brand of Instant Yeast you use and what is the size of your oven as you have been able to bake 2 dozen loaves in one go … I am in the process of purchasing a new oven.
Hi Irene,
I use DCL brand of instant yeast that is easily available here in the UAE. I have a Siemens electric cooking range with 5 cooking zones (burners) and a very large inbuilt oven that is of 112 litres capacity. Hope it helps 🙂
Yum! These rolls really hit the spot! Thanks for sharing!
Thanks Karly!
Hi….I followed your recipe for the pav (served with homemade pav bhaji) tonight and oh boy! Just like you I’m super super super excited with the outcome!!!! In Mumbai we do get the best of pav’s, but the thrill of making my own is exhilarating!!! Thank you
I baked 12 delicious, fluffy pavs last night using your recipe!!! Oh boy! I was jumping with joy seeing them! Served them with homemade pav bhaji. Even though I get good quality pavs in Mumbai, the thrill to bake my own is unmatched…..thanks to you!!!
I am so thrilled to hear that Tanuja! So glad that this recipe worked for you 🙂 Thanks for your feedback!!
Hi Shireen, I tried these today & they came out fantastic. Except the tops didn’t brown at all. I did the egg wash as per recipe. No idea what went wrong. Can you please advise? Having said that, thank you for all your wonderful recipes. I’ve tried out quite a few and each one is a treasure.
Hi Jess,
So sorry for the delayed response. Perhaps the pav required a little more baking time then? A couple of more minutes should help. Alternatively you could switch the oven to ‘grill’ mode for just a minute or so. That should do the trick!
Shireen thank u for this receipe ..made and so happy it came out so good…
do u have the reeipe for ‘Brun pav or kadak pav as we call it in Mumbai..the hard crust so yummy..pls let me have it if u know tthe receipe…thks alot…God bless u
Hi,
Thanks so much for your feedback! I will surely post the recipe for kadak pav soon!
Hi … if i use bread maker ( dough option) , would the bread turn out ok?
Hi Yati,
I am not sure how a bread maker works as I have never used one. Perhaps you can check the user manual and decide. There should not be any problem…
Thanks Shireen for sharing the homemade recipe. However, I am yet to try your version. But I have a question for lukewarm water. What is the exact temperature of the lukewarm water?
I tried the other receipes that had lukewarm milk instead of water. So I am not sure, if the same temperature of the water would. Looking forward to try it.
Hi Voleta,
I haven’t checked the exact temperature of lukewarm water. It would be somewhere between room temperature and hot. Too hot and it will kill the yeast, too cold and the yeast wont get activated. It would be safe to say that around 95 degrees F – 100 degrees F would be termed as lukewarm
Hi Shireen
Lovely , perfect looking pav. Had one doubt, can I use milk instead of water in the same proportion ?
Hi Swathi,
I guess you can. I haven’t tried it though…
Hi Shireen,
These were absolutely delicious and so soft, just as you promised! I’ve never made bread that has turned out this soft and spongy before. Thank you for the recipe.
Hi Lesley,
Thank you so much for your feedback! So glad to hear this!
Hi Shireen,
I am a huge fan of Ruchik Randhap and you have never disappointed me!
I tried these Pav and they came out really well.. Soft and Delicious..
Thank you so much for the fool proof recipe 🙂
Hi Zeena
Thank you so much for the kind words! I am so glad that the pav turned out well. Thanks for leaving your valuable feedback!
Hey Shireen ,Thank you so much for this awesome recipe, Though my first time with breads . I halved you recipe and it came out perfect ,All thanks to your recipe, now I want to make it again in big lot.
Hi Misria,
Thanks a lot for the feedback! I hope you enjoy making a bigger batch!
Hi Shireeeennnn, I baked pao once again… This is probably the third or fourth time that I am following this recipe. So soft and delicious. This is a foolproof and my go to recipe for pao.
Hey Shailu, thanks a lot for the great feedback! Happy to hear that it is your go to recipe now 🙂
Tried out your recipe it turned out fantastic. Thanks Shireen. We finally got a taste of Mumbai pao in the US. Our entire family loved it. Is there any chance of you posting a brioche recipe? Love your attention to detail. I’m encouraged. God bless
Thank you so much for the kind appreciation!! I will be trying out the brioche soon! So do stay tuned for the recipe!
Good Recipe.
Thanks
Thanks a lot!