
Folks, I know its been a while since I posted a new recipe and I thought this was the right time to share the recipe of the homemade bread that the hubs made last weekend. I am sure that like us, many of you are safe indoors, possibly nurturing little minds via distance learning. During these unprecedented times, I pray that all of us are safe, this problem ends soon and we are back to normal. Oh how I miss the hectic days.
Coming back to the bread of the day, this was hubby’s experiment as he had not ventured into baking all these years and felt it was about time. The kids are at home and they need to munch on something during the day so he decided to bake some bread. A simple, rustic and easy bread that required no special skills and needed no baking tins. This bread is so easy to make that anyone can try it. All you need is some flour, yeast, salt, sugar & water – the simplest of ingredients. You can treat yourself to some delicious, warm bread that can be eaten in so many different ways – slather some butter on it or a chocolate spread of your choice. If you want to go a step further, smear some garlic butter and lightly toast it. Want some for breakfast? Dunk the thick slices in some cinnamon flavoured egg, milk & sugar mixture and you have a tasty treat to start your day.


We enjoyed this bread over the weekend. The kids really liked the fact that daddy made it and plus there was something simple yet filling in the bread box. There is definitely something wonderful about homemade bread. The whole process of kneading the dough and shaping it is so therapeutic. Besides, there are no preservatives and the taste & aroma of freshly baked bread is something else.

For this recipe we used active dried yeast which I believe is pretty common in Mangalorean Catholic homes as we all use some to make sanna and appams. Yes, the same tin that you got from your relative living in the Gulf. I used that. However, for most of my bread recipes I used instant yeast. Now the difference is that active dried yeast has slightly bigger granules than the instant one and requires to be activated before using. By ‘activated’ I mean that you need to mix the yeast, sugar & some lukewarm water and wait for it to froth, which takes about 10-12 minutes. The sugar helps the yeast to feed on and bloom. This step is important as you will know if your yeast is good. If the mixture looks cloudy and fails to froth up even after 13-14 minutes or more you know that it is flat and will not help in raising your dough. In which case it is best to discard it and start the process using a new package of yeast. Instant yeast on the other hand can be added directly to the flour. I had never really made breads with the active dried yeast except in today’s recipe so I won’t be able to offer much help on which fares better than the other. However, one thing I can assure you is that if you have any brand of active dried yeast, you should be able to make this super simple bread.

Want to try some more breads? Hope you like these!
If you give this recipe a try do leave a comment on this post down below and don’t forget to give it a star rating! It will really help more readers discover my recipes! Don’t forget to check out my latest videos on my YouTube channel. If you like what you see, do give me a thumbs-up (like), share & comment and subscribe to my channel so that the gods of YouTube (a.k.a algorithms) recommend my channel to a wider audience with similar tastes and more & more people can discover my videos!
And while you’re here, do follow me on Instagram, Pinterest, Facebook and Twitter. If you’d like to say hello or have detailed queries do send an email at ruchikrandhap@gmail.com. I’d love to hear from you!
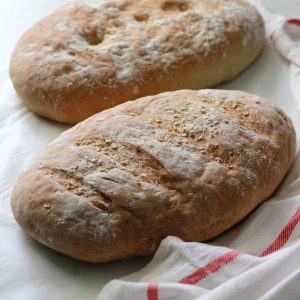
Click the image below to save this recipe on Pinterest!

Ingredients
- 2-1/2 cups (625 ml) lukewarm water
- 15 grams (3 teaspoons) active dried yeast
- 1 tablespoon sugar
- 1 kg all purpose flour
- 1 teaspoon of salt
Instructions
- If you are using instant yeast you can skip this step but if you are using active dried yeast you need to activate it first. So to begin, take about 1/2 cup (120ml of the 650ml) of the lukewarm water in a bowl and add the sugar and yeast to it. Stir well to mix and then cover and keep in a warm place of your kitchen (or inside the microwave - don't turn it on) for about 10-12 minutes. The mixture will froth and look foamy. If it does not look this way you need to discard the mixture as the yeast is probably old and hence useless. Restart with a new package of yeast. Using yeast that has not frothed will not help the dough to rice and hence waste your ingredients.
- Reserve some flour (about 1/2 cup) and add the rest to a large bowl. Once the yeast has frothed add it along with the salt to the flour. Add the remaining water in parts and bring everything to form a smooth dough. The dough will be slightly sticky but it will come together as you knead it.
- Turn out this mixture onto a clean working surface dusted with a part of the reserved flour. Using the heel of your palm stretch and knead the mixture into a smooth, pliable dough. This can take around 5 minutes or so. Shape it roughly into a round ball of dough
- Cover the dough ball with a damp cloth and place it in a warm place of your kitchen for about 1 hour or till doubled in volume
- When the dough has doubled, punch it down to release the air. Then gently knead it and cut into two portions. Shape each portion into a boule (round) and transfer on a lightly dusted baking tray. Cover with a dry cloth for another 30-45 minutes.
- Preheat the oven to 180 degrees C for about 15 minutes. Before popping the tray into the oven dust the surface of the boules with plain flour and score the top (apply diagonal cuts). This is optional.
- Bake for about 30-35 minutes or till the crust turns a beautiful golden colour and the bread when tapped sounds hollow.
- Remove and allow to cool completely before slicing. Store in an airtight box in a cool place and use within 2-3 days
Notes
Disclaimer
The nutritional values are only indicative.
can we use salted butter the one we use for bread at breakfast time (amul butter or nandini butter)
This recipe doesnt require butter. However, if you wish to apply butter & eat, it is upto you – salted or unsalted
Hi Shireen.. I have been a silent spectator reading and trying most of your recipes and enjoying it to the best.. Tried your homemade bread recipe which I tried for the first time.. it’s come out too good.. Thank you for posting lovely recipes..
Hi Tejashwini,
Thank you so much for sharing your feedback about the bread! I am really happy to know that it turned out well!
Hi Shireen In case I use 500 g of all purpose flour, should I halve the quantities of yeast, water, sugar, and salt? Please let me know. Thank you.
Hi Margaret,
Yes, pls halve the other ingredients as well if you are using 500gm of flour
This homemade bread recipe looks absolutely delightful, I love how simple and rewarding it seems to make fresh bread at home. The golden crust and soft, fluffy texture are so inviting—perfect for sandwiches or enjoying with butter. I can’t wait to give this a try and fill my kitchen with the smell of freshly baked bread.
Thanks a lot Supriya!
It’s simple, using basic ingredients, and the fact that it doesn’t require special pans makes it perfect for beginner bakers. I love the personal touch of the recipe, with a family member trying something new in the kitchen. The detailed instructions and tips, like activating the yeast, are really helpful. The bread’s versatility, from simple butter spreads to cinnamon egg dips, adds so much to its appeal.
Thank you Supriya!
The homemade bread recipe on Ruchik Randhap provides clear, step-by-step guidance for creating soft, flavorful bread using simple ingredients. It emphasizes proper kneading, proofing, and baking techniques to achieve a perfect loaf. The recipe is versatile and easy enough for beginners while offering tips to elevate your baking skills.
Thanks a lot for your great feedback!