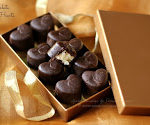
Homemade Bounty Chocolate
Yummy bars & hearts made from coconut mixed with condensed milk to give it that classic Bounty chocolate taste - perfect for the festive season!
Servings 12 bars or 35 hearts
Calories 249kcal
Equipment
- a double boiler (to melt the chocolate) or a small saucepan and a heatproof bowl that fits over it
- a bowl (to mix the condensed milk and dessicated coconut)
- a sieve or large tea strainer
- a small spoon to pour the chocolate
- 1-2 silicon chocolate moulds as required (heart shape or any other shape will do)
- wire rack (to place the bounty bars to set)
Ingredients
- 250 grams bittersweet dessert chocolate roughly chopped * see notes
- 1 cup dessicated coconut unsweetened
- 1 cup sweetened condensed milk I used Nestle Milkmaid
Instructions
- Before you begin make sure that all utensils and moulds required to make chocolate have been thoroughly washed and air dried. There should be absolutely no moisture in the bowl that is used to melt the chocolate.
- Place the dessicated coconut in a bowl and add the condensed milk to it in parts, mixing along to achieve a stiff mixture. You should be able to form tiny balls without the mixture sticking to your palm. Adjust the quantity of the coconut and the condensed milk accordingly till you achieve this.
- Make small, marble sized balls from the coconut mixture and lightly shape it into hearts. Each of these balls should be small enough to fit inside the moulds. You will also be filling the mould with chocolate so roll them into the appropriate size.
- Next, place the chopped chocolate in the double boiler (this is usually a special utensil made for the purpose of melting chocolate) or just place a little water in a saucepan and bring it to a bare simmer. Then place the bowl with the chocolate over the mouth of the saucepan making sure that the base of the bowl neither touches the water in the saucepan nor the steam escapes the rim of the saucepan. Even if a drop of the steam gets into the water it will make the chocolate seize (harden) and ruin it. * see notes
- Stir till the chocolate has melted and looks glossy (shiny). It should be of pouring consistency.
- Pour the chocolate about one thirds full into the mould and then gently drop a coconut heart in the centre. Fill up with some more chocolate. Repeat till all the moulds have been filled up.
- Tap the chocolate mould lightly to release any air bubbles and also to help even out the chocolate.
- Cover the mould with a mesh/net cover (like a fruit basket or fine mesh colander) and allow to set until the chocolate has completely hardened and you are able to un mould the chocolate easily.
- Store in an airtight container.
Notes
1. I used Carrefour's in-house brand of patisserie chocolate meant for desserts (they also have baking chocolate). It is available in 52% or 64% and 72% cacao (percentage of cocoa to milk solids in the chocolate). The higher the percentage, the bitter the chocolate. Unless you like really bitter chocolate you can stick to the 52% cacao variety. You can use any chocolate that is meant for desserts as it will have a really thin and flowy consistency. You can also use chocolate chips but the texture and consistency will be slightly thicker.
2. Depending on where you live (hot or cold weather) the setting time of the chocolate will vary. I leave the chocolate mould at room temperature as my house has central AC. If you live in really warm weather then maybe you could refrigerate the mould but it will begin to melt at room temperature.
3. It is very important that you don't let any moisture get into your chocolate during the process of melting it. This is because chocolate contains no moisture but contains sugar that will want to melt when it comes in contact with water. Even a drop of water will seize the chocolate, harden it beyond control and you cannot use it to make chocolate. However, if this unfortunate incident happens, just keep that hardened chocolate aside to be used later. The hardened chocolate is not a complete waste - you can add some fresh cream and make a ganache out of it to frost your cakes with or you can use it as fondue and dip some fresh fruit or cake as a wonderful party dessert or even add some milk and make a chocolate smoothie! It is just that you need perfectly melted chocolate that will harden and turn brittle when you make homemade chocolates
4. The chocolates when turned out of the mould are pretty and glossy. During my photoshoot they began to melt and hence the glossy finish doesn't appear in the pictures above
Nutrition
Calories: 249kcal | Carbohydrates: 26g | Protein: 4g | Fat: 15g | Saturated Fat: 10g | Polyunsaturated Fat: 0.4g | Monounsaturated Fat: 3g | Trans Fat: 0.02g | Cholesterol: 10mg | Sodium: 37mg | Potassium: 251mg | Fiber: 3g | Sugar: 22g | Vitamin A: 79IU | Vitamin C: 1mg | Calcium: 87mg | Iron: 2mg