Pineapple Pastry
A classic bakery style layered pineapple flavoured cake that is deliciously moist and filled and frosted with delicately sweetened, soft whipped cream. Perfect for a birthday or any celebration!
Servings 8 servings
Ingredients
- 4 eggs
- 175 grams sugar
- 150 grams all purpose flour
- 25 grams cornstarch cornflour
- 1 teaspoon baking powder
- 1/2 cup unsweetened pineapple juice or buttermilk or water at room temperature
- 1/2 teaspoon pineapple essence or vanilla extract
- 3 tablespoons oil
- 1 teaspoon vanilla extract
- a pinch of salt
To fill & frost:
- 500 ml whipping cream* see notes
- 4 tablespoons icing sugar
- 1 teaspoon vanilla extract
- 3 pineapple rings (I used canned, chopped fine (to fill)
- 1 pineapple ring cut into bigger pieces (to decorate)
- glazed cheries (to decorate)
- 1/2 cup pineapple juice (I used from the can) * see notes
Instructions
- Grease and line a 9" round pan with baking parchment. The ideal depth of the pan is 2 inches but if your pan is not so deep, then ensure that the baking parchment is cut in such a way that it forms a tall edge. This will give the cake some height when it rises.
- Optional step if you are living in very warm weather: Place a deep bowl (preferably steel) along with the whisk/blades of the beater in the fridge for at least 30-45 minutes before you start making the icing. This will help you whip the cream to stiff peaks more quickly than you would if you don't chill the utensils.
- Since the cake is tall and if the space between your middle rack of your oven and the upper heating elements is small, then move the rack to the lower part of the oven. If not, you can just place the tin on the middle rack itself. Preheat the oven to 165 degrees C
- In a deep bowl, beat the eggs on a high speed for about 6-8 minutes or till they turn pale in colour and fluffy. Add sugar in parts and continue beating. Add the pineapple essence/vanilla extract too.
- In another bowl sift together the flour, baking powder, cornstarch and salt four times. It is important to sift it so many times as we want a light, airy cake. Sifting helps incorporate air into the flour and gives it the desired spongy texture which is very essential for a pastry cake.
- Now add the sifted flour in parts into the beaten egg mixture and gently fold in. Mix the oil & pineapple juice (or water or buttermilk) together and add it to the batter and fold in. Do not over mix.
- Pour the batter into the prepared pan and tap it on the table a couple of times to get rid of any air bubbles in the batter.
- Bake in the pre-heated oven for 45-50 minutes or till the skewer inserted comes out clean. Remove the pan from the oven and place it on a cooling rack for 15-20 minutes. Then slowly un mold it and allow it to cool completely.
- Once the cake has cooled down, thinly slice off the browned top, base and sides of the cake. You will need to use a sharp serrated knife for this so that you remove only the brown bits of cake.
- Slice the cake carefully into 3 layers and keep them covered to prevent drying.
- To prepare the icing, place the whipping cream, icing sugar & vanilla extract in a bowl (see step#2) and beat it for 5-7 minutes or till the cream forms stiff peaks. Do not continue to whip beyond this point as the cream will curdle within minutes and your effort will be ruined. Divide the cream into 4 parts in the bowl itself. You will need roughly 1 part on each of the layers and 1 part on the sides.
- To assemble, apply a dab of whipped cream in the centre of a cake stand, cake board or serving tray. Carefully place the bottom layer of the cake on it.
- With a pastry brush generously apply 2-3 tablespoons of the pineapple juice all over its surface. Place one part of the whipped cream and level up the surface. Add half of the finely chopped pineapple bits to cover the surface. Then place the second layer of the cake and brush it with the pineapple juice. Add one more part of the whipped cream, level it up and add the remaining pineapple bits on it.
- Now place the final cake layer on top, brush it with the remaining juice, add one part of the whipping cream, level it up. Then use up the remaining whipped cream to cover the sides of the cake and decorate on top using a piping bag & nozzle to decorate as per your choice.
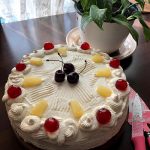
- You can use a cake scraper to form a pattern on the sides of the cake. Decorate the top with the pineapple chunks & the glazed cherries.
- Chill the cake for at least 2 hours before serving, especially if you are living in warm weather, you don't want the whipped cream melting into a puddle as hot weather can also cause the cake layers to slip off the whipped cream making the cake look lopsided.
- Cut, serve & enjoy a beautifully delicious cake!
Notes
The original recipe asked for 700ml of whipping cream. I still had some leftover after decorating it, so I plan to use only 500ml next time. However if you like a thick layer of whipped cream on your cakes - to fill and frost, then by all means use 700ml.
If you don't have pineapple juice to brush on the cake layers you may use simple syrup (mix of 1/4 cup sugar dissolved in 1/4 cup warm water and stirred till the sugar dissolves completely - then cooled down before using) flavoured with a few drops of pineapple essence.